Shopping Cart
Find your guide
See Other Manuals

Get to know it!!
Your home bar just got an upgrade! With our Clear Ice Cube System you can elevate your craft cocktails to the next level. Not only will you have a more visually appealing ice cube but, a perfectly solid cube packed with only water molecules can maintain its low temperature longer and imparts less "ice" flavors to your cocktail. Now let’s show you how it works!
THE COMPONENTS

- The Tray. Made from FDA grade silicone. This part will keep your finished cubes
- The Reservoir. Made from BPA free plastic or FDA grade silicone (version dependent). This part will separate out the cloudy ice.
- The Insulation. Made from PP Foam. This part controls the direction of the freezing which delivers the results you need.
(As we continue to collect feedback on our products we make incremental improvements, so you will find that directions may slightly vary depending on which version you have)
THE PROCESS

Start with the reservoir in the insulation part and grab your water.
For best results we recommend using filtered or bottled water, depending on the tap water quality in your city, regular tap water should do the trick. Boiling water is not necessary and does not make much of a difference, particles that cause cloudy ice do not escape when water is boiled.
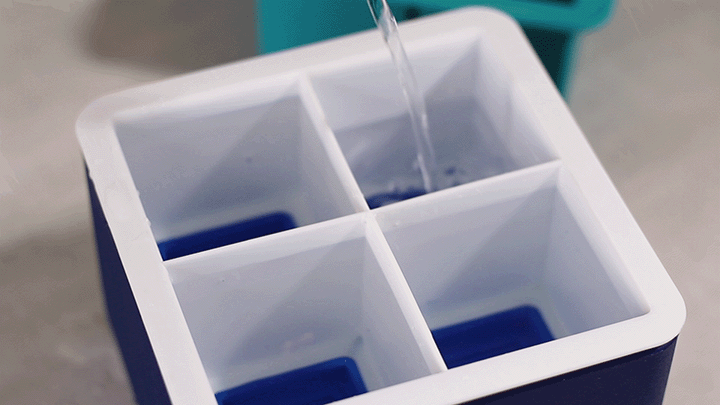
Fill water the reservoir to the "Fill Line" or approximately 1/4 inch from the brim.
Depending on which version of the product you have the reservoir may have a fill line etched into it, you will also find that the compartments may be connected leading to easier filling.

Place the tray into the reservoir and let it slowly fill up with water
We recommend to not push down on this part, or to push down very gently as if you try to rush this process the water may spill from the sides.

Fill with additional water if needed, until the water is to the brim.
The water should be filled to the lower brim so that you can easily move to the freezer without spilling
 Freeze for 24 hours.
Do not place anything on top of the Clear Ice System as this will hinder your results. The product is designed to freeze from the top down and further insulating it from the top prevents this.

Remove from the freezer and remove the reservoir from the tray. Fill the insulation component with hot water.
This step helps to accelerate thawing of the reservoir which makes it easier to remove the cubes.

Let the reservoir site in the warm water for 5 minutes.
It is best to do this step in the sink to avoid spilling. If you have a silicone reservoir than thawing time is much quicker and does not require this step, you will find that you should be able to pop the tray from the easier with more ease.

Take the tray out of the reservoir, discard any ice stuck to the tray or in the reservoir and remove finished cubes from the tray.
On the version of the system with the plastic reservoir, you will find that you can pop the tray out by applying pressure from the top down onto each corner of the tray while it is sitting on your countertop. The bottom has flexible "buttons" which when pushed will help push the ice out.
On the version of the system with the silicone reservoir you will find that you are able to push the tray out with more ease.

Use your ice in your favorite cocktail, or place finished cubes in a zip lock back for storage in the freezer.
We like to do the messy bit in advance and store all of our finished cubes in the freezer for easy use when needed. If you take all air out of the bag before freezing it you will find that the cubes can now stay perfectly clear and frozen for quite a while.Troubleshooting
My Ice is Not Clear
Although we have tested this product with various water sources, the final clarity does depend on the water you use. For best results we do suggest using bottled spring water.
My Ice has Bubbles
This is rare, but usually caused by pouring the water too quickly into the molds. Give the tray a slight shake before putting it into the freezer to clear any air pockets that may have developed inside the cavities of the molds.
I Can't Get My Ice Out
Remember to let your the reservoir sit for 5 minutes in warm water or for 10 minutes on the counter before attempting to remove the ice. Once you allow it to thaw, this will help to get the ice out. We recommend to place the reservoir on the countertop with the "push buttons" on the bottom and then pushing down on the corners of the tray. This helps spread out the force amongst the "push buttons" and is the easiest way to remove your tray and clear cubes.
My Silicone Ripped
Now that should not happen! Luckily all of our products are under a lifetime warranty, so complete a warranty claim and a member from Eparé support will help you out ASAP
My Issue is Not Listed
If you have any other issues or questions please complete a warranty claim and a member from Eparé support will help you out ASAP.
Love it? Review it!

That’s a picture of my mom, brother, and me in 2012. I was 21 years old and she entrusted me with a small loan to start Eparé. She wanted me to make the best possible kitchen products, and the easiest way to achieve this is with your feedback! It helps me continue to improve our products and provide the best possible buying experience.
Add a review on Amazon.com or share with your friends on social media! Don't forget to tag us @eparelife or use #eparelife.